Kitchen Backsplash Details Matter

You have to get a lot of small details right to make the kitchen in your new house, or your kitchen remodel, turn out great. One of the more difficult parts of the kitchen is the backsplash. When I say “backsplash,” I’m referring to the wall area at the back of your countertop above the countertop and below the upper wall cabinets. This space is usually about eighteen inches tall. And unfortunately, from an aesthetic point of view, it is often filled with electrical receptacles and light switches. But there are ways to deal with these necessary intruders.
Traditionally, the kitchen counter top would have a four-inch tall backsplash at the wall. This short backsplash would usually be made of the same material as the counter top. The purpose of the backsplash is to make cleaning the counter top easy without allowing your cleaning cloth or sponge to make marks on a painted wall surface. It also gave you and edge for liquid spills so the liquid would not run down the back of the cabinets. The wall above this short backsplash would be painted or possibly wall papered.

Image Note: In the image above, the electrical switches and outlets are well-disguised in this subway tile backsplash because there aren’t any. This is a “demo” kitchen in a cabinetry shop. I guess they could not stand to include the necessary intrusion into their model kitchen. If this was a real kitchen, white electrical plates set sideways and aligned with the tile pattern would have helped camouflage them.
These days, especially in higher end homes, the four-inch tall backsplash is being omitted in favor of a full height tile or stone surface that extends from the counter top to the upper cabinets. This is sometimes made of the same stone as the counter top. But more often, this surface is tiled. It is a great place to express a bit of design. The tile pattern can be intricate and artistic. Travertine and marble tiles are popular choices for backsplashes. But those pesky electrical switch plates get in the way.
One solution is to place the switch plates horizontally at the top or bottom portion of the backsplash wall. This will pull them out of your tile pattern and away from any deco tiles that might be planned for the center of the backsplash wall. This all needs to be planned ahead since those electrical junction boxes are installed weeks before the wallboard, cabinets and countertops ever arrive on the construction site. Give your builder or electrician precise dimensions on where you want these electrical devices to be located.
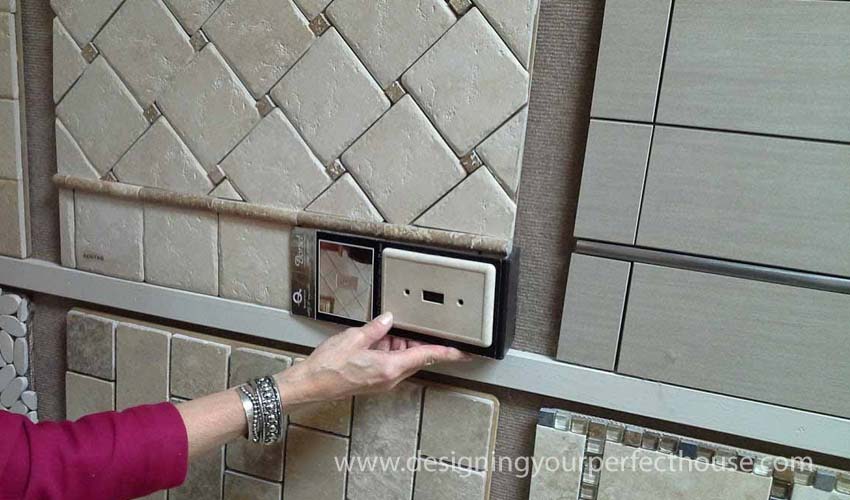
Resin switch plates that mimic travertine will help them blend into the backsplash.
The switch plates on these electrical devices can be further disguised by faux painting them. This can be costly and the paint can eventually chip. A better solution is to use resin switch plates that have the look of stone. These are fairly inexpensive and really do the trick. They are available at tile stores and even at places like Home Depot. For granite backsplashes, you can get faux granite switch plates, too.
For the ultimate good look with a stone or tile backsplash, you can actually have switch plates made to order from the very stone tiles you are using. Columbia Gorge Stoneworks, and other fabricators like them will take your tile and make switch plates that will be a dead match for your tile.
One additional tip. Select a color for the switch or electrical receptacle that is close to the color of your tile. You don’t have to settle for white.
I hope this information is helpful to you. You might want to get yourself a copy of my best-seller, Designing Your Perfect House. It is chockfull of valuable tips and advice that will save you many times the cost of the book on your house building or remodeling project. You might also like The Well-Centered Home: Simple Steps to Increase Mindfulness, Self-Awareness, and Happiness Where You Live. It will show you how to make your home a happy place.